Part 3.
Rigging:
This was the part of the teddy where I was the most worried and felt unsecure on how I should do things. We talked a bit about it, and we knew that we needed a rig we could fully animate, since we have some close up shots where the teddy is falling or being picked up from the ground. But we also have some shots where the girl is running with the teddy, of course you can animate it with a standard rig, but we were looking at the idea of getting some automatic into it. Like a ragdoll type of thing.
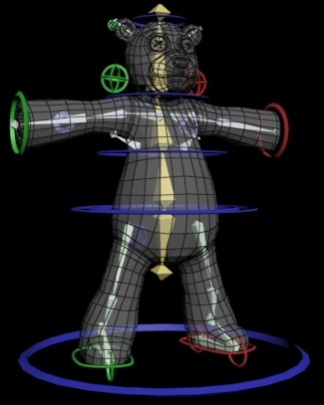
My first priority was to get a teddy up and running with a standard rig. I have rigged a character before, but wasn’t sure on how to do everything, and it didn’t make things better when Knut wanted some stretch in some areas of the body.
I needed to ask our favorite rigger in the class, Sebastian Antonsen. He can rig everything, and for the most of the time say yes if you ask him for any help. He doesn’t just give you help, he explains things down to the smallest detail and keeps doing it to you get it. When I asked him about how to get a stretchy leg, he made me this VIDEO.
I needed to ask our favorite rigger in the class, Sebastian Antonsen. He can rig everything, and for the most of the time say yes if you ask him for any help. He doesn’t just give you help, he explains things down to the smallest detail and keeps doing it to you get it. When I asked him about how to get a stretchy leg, he made me this VIDEO.
Everything else on the rig is pretty straight forward, unless the stretch in the spine. IK solvers on the legs and arms, and the eyes are made so they can bump back and forth a bit.
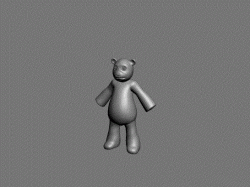
When that rig was done, I started looking for an optional rig that worked a bit more automatically and would make things easier when he is being carried around. I searched the internet for possible ragdolls options, but many of them needed to be simulated with reactor. And we have so much simulation already for the movie, that this would only make things take even a longer time. I had almost given up when Sebastian had sniffed up what I was looking for. He had already made me a prototype of what he was thinking about and showed me a GIF file of it. After that he told me what he had done, and let me have a go at it while he was sitting beside me telling me what to do.
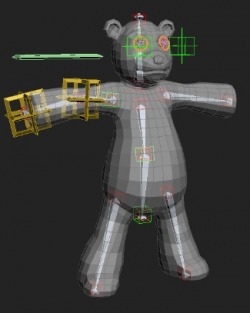
The main idea is that every limb that needs to be automatic thrown around got a spring modifier on it. To achieve a good result, we made the bone stretchy first, so the point would fall down and hang a bit under the limb. This would give a much more of a realistic result and you could add gravity to get even a better result. The only problem with this was that when a kid runs with a teddy bear, it is being dragged after the arm. As you can see here, the dragging point is in the middle of the teddy. I needed to move this up to the arm.
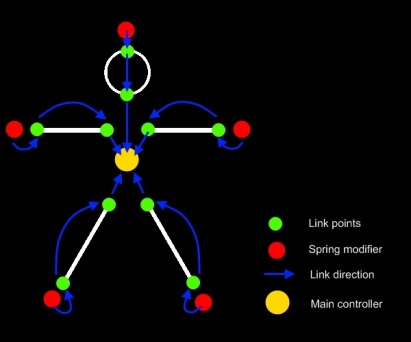
I have tried to show how we did it the first time with a simple drawing. Everything is rigged to the main controller in the middle. The spring modifiers are own LINK POINTS too.
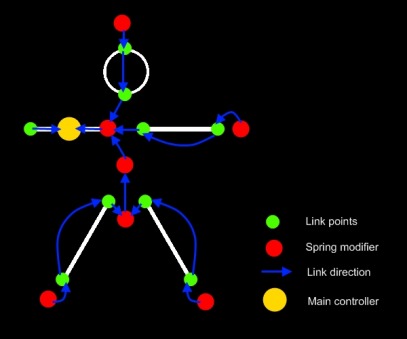
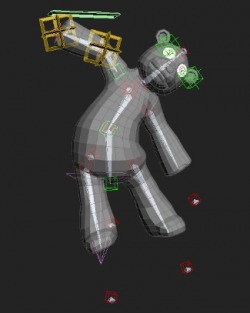
And here is what I ended up with after doing it all over again but by moving the main controller up to the arm of the teddy. The spot where the girl will be holding it when she runs.
And here is what I ended up with after doing it all over again but by moving the main controller up to the arm of the teddy. The spot where the girl will be holding it when she runs.
That’s basically how I made it. I was really happy with it, but didn’t know how it would react when it is being put in the hand of the girl.
Note: I have tried it now, and after some readjustments it is working okey. Had to remove one of the flex points because it created the teddy to flip totally around when it are being drag back. Because of the missing spring point, the arm seems a bit stiff, so I will try to turn in on again, but then reduce the spring affection.
Experience.
This is the part where I feel I learned the most useful things even though I am not aiming for a career where I need to rig a lot. But I learned to think in a different way, and attack things in bit more efficient way. Been through how scripting can help me do repetitive things faster, how a rig can be done to get things to go more automatically and just how a basic should work when it comes to animation. Loads of small things I won’t mention now. A big thanks to Sebastian Antonsen for teaching me loads of things.
 RSS Feed